 Foo
Foo
It’s been years since I started looking into making sake.
For a combination of being phenomenally bad at seaching the internet for how to get it done, overblown expectations of insane complexity of the process and rather poor wisdom in time investments, it took over 4 years from when I first got a bag of koji rice at Japan Centre (I think it was still in Soho then?) and actually making some rice bubble, and I owe the fact that we got there entirely to Laura.
Find a reference
I have no idea how, but Laura found this one that looked convincing. Plus a bunch of other random resources on youtube, we got to learn about what Doburoku is, and that’s fine to brew sake without a 3-stage ferment. I’m sure the result cannot be as good, but getting started is really hard if you have a complex process from the onset.
What about koji?
I spent significant time trying to find out whether the koji kome I had - that was labelled as “good for amazake” - was actually the right thing to use or had enough enzymatic power to make sake. I did not find a clear answer, but instead realised that the pack had expired by over a year.
I was considering ordering spores from an EU shop, but with Brexit being in the first months of import customs confusion it seemed impractical. Luckily Laura found out about the Koji Fermenteria, where we got to order fresh, locally made koji rice.
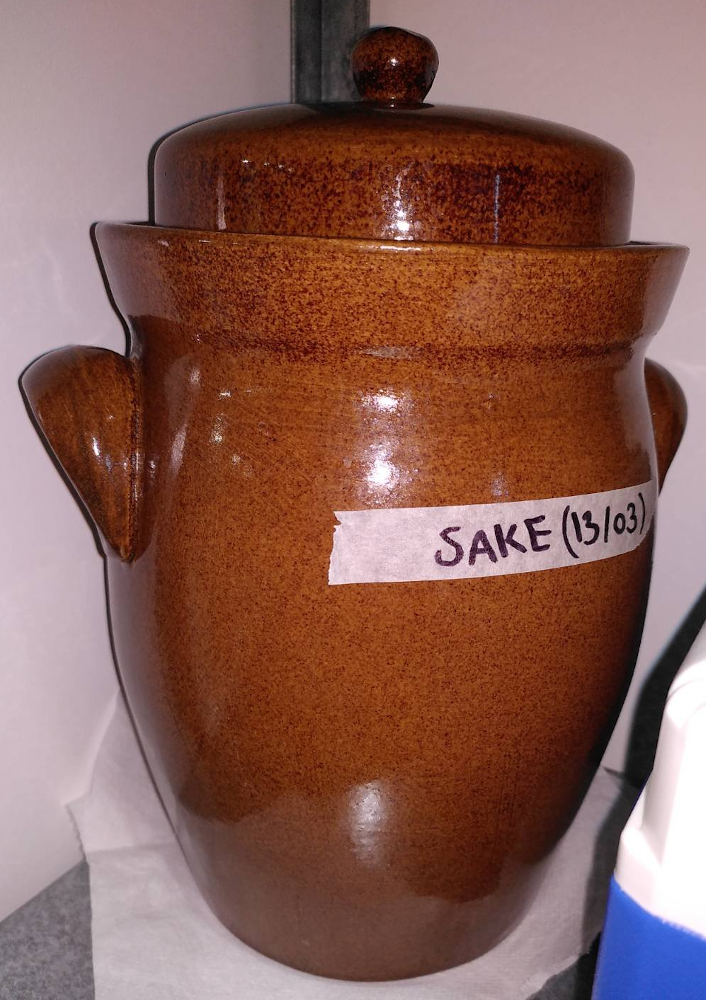
Equipment
I brew beer in 4.5l demijohns. Needless to say, the idea of using rice in a container with narrow neck sounded ~plain dumb~ rather impractical. But roll back a few months - Laura has been looking into making gochujang, so we had a 5l fermentation crock ready for it. Except that due to the lack of a critical ingredient for gochujang making, the crock ended up being repurposed for rice-based brews.
For the steaming setup we used a 31cm carbon steel wok with a 30cm bamboo basket and a cheesecloth. Works great on induction hobs.
Yeast
Apparently most doburoku recipes call for bread yeast - my guess is that they are written for “whatever you have at home”. But having a little intuition from beer making I rightly decided to pick a brewer’s yeast instead. My first choice would have been the sake-specific yeast from Wyeast labs, but a pack is for 25 liters batches, while I’m not even sure if we get any more than 2l from this recipe. Plus this being a first attempt, buying the right-but-pricey stuff sounded a bit wasteful.
Still, I wanted a strain that could resist in environments with more than 5% ABV. Looking at the options from Fermentis, which is the producer I use regularly, I found a couple options. One was listed as flavourless but specifically effetive for saccharose, the other good in general but adding some floral notes. Being unsure of what rice saccharifies into, I opted for the generic one - SafAle T-58. Also floral notes sounded good??
Little I knew this is commonly used for belgian-style beers.
Rice
Can’t remember how, but we ended having a bag of sweet rice for this. I have no recollection on how we reached the conclusion that it had to be sweet rice, but turns out that it wasn’t the right choice.
Preparation
So, based on the recipe mentioned above, yeast at hand and amount of kojikome we received in the mail, we whipped up the recipe as follows:
- 800g rice
- 250g kojikome
- 1040ml bottled water
- 160ml warm water (to dissolve yeast)
- 2.4g SafAle T-58
The bottled water is because the water we get from the tap is a bit on the hard side and a softer water is recommended for sake.
A day ahead we measure rice, clean it (rinse, mix and drain until water ~runs clean~ looks kinda clearer) and soak in plenty cold water overnight.
Execution
Reminder: sanitise the shit out of everything before starting. I used StarSan, loaded in a little spray bottle for spraying over everything except the cheesecloth, which was boiled for a couple of minutes instead.

Strain the rice soaked overnight. Prepare wok and baskets for steaming, then wrap rice in cheesecloth and put in the steamer. Steam for about 50m, remembering to keep an eye over the water level in the wok.
In the meantime, boil some water and pour 160ml in a jug to cool down to lukewarm. Dissolve yeast in it when temperature is low enough (do not rush this, a temp too high will kill the yeast). You can probably pitch the yeast direct, but dissolving it in water makes it very easy to stir in the rice mixture.
When the rice is done it should have some bite and not be porridgy/sticky. Take it off the steamer and stir to cool down and dry - in 10-15m it should become nicely dry and having individual grains sticking rather than forming watery lumps. Leave to cool down more if needed (again - too hot can kill the yeast), then throw in fermenting vessel, cover in water, mix, pitch koji and yeast, mix, seal, ~profit~ go clean the kitchen.

Fermentation
We left it for about 13 days. The first 2 or 3 in a corner of the kitchen where it’s slightly warmer for the yeast to activate in full, then moved closer to a window where it’s a bit colder to go for a low-and-slow ferment (or at least in principle, I’m not entirely sure it made much practical difference). We started stirring it daily with a StarSanned rice spatula after moving the fermentation crock, although we later found out that the opposite would have probably been a better idea.

Bottling the results
Use the same cheesecloth as before (remember to boil it again for cleanliness) to strain the mixture out of the fermenter, squeezing to get as much liquid as you can out of it. And don’t throw away the sake lees that you strain out! It can be very easily used to make some very nice japanese-style pickles (tsukemono).
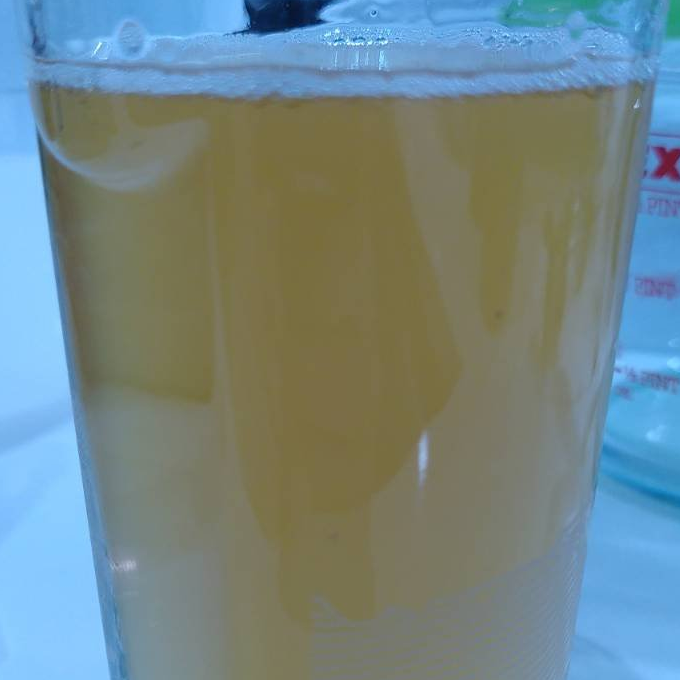
The result we got was waaaaaaay cloudier than we expected! Decided immediately to try strain some for science. We used some coffee filters, but the sediment is fine enough that clogs them real fast, so to filter the first 0.5l it took 6 filters and several hours of patience. We found out only days after, but after a day in the fridge the sedment deposits at the bottom of bottles so with some swift wrist pouring trickery you can get the liquid in a glass leaving most sediment behind.
We ended up with 4x.5l bottles - 2l total of product. And the result is… actually very nice for a first try! You can definitely taste the base floral notes typical of a koji ferment, and is pleasantly boozy.

I measured a FG of 1.026 - but I don’t have an OG so idk what to make of it ¯\_(ツ)_/¯ .
Although:
- it has prevalent banana notes
- it’s way cloudier than expected
- filtering it definitely takes away some rough edge
Of course this is doburoku and far away from any professionally made sake, it cannot compare. But it’s very drinkable and an excellent result for a home production!

Costs
Won’t go dig out the individual receipts - but for koji, yeast, rice and bottled water it has been about 20GBP, with yeast and rice being enough in the bag to be used in 2 more rounds of the same recipe. Out of this the koji was 12.5GBP so finger-in-the-air about 15GBP of materials per brew?
Plus equipment, which is a good investment anyway for steam cooking and the crock that can be used to ferment other things. I think the total investment for crock, wok, cheesecloth, bamboo baskets and swing top bottles might have been around 65GBP but you can sure make it cheaper.
I don’t have a measure of hob electricity costs.
Time-wise, it took a ridiculoud amoount of time to get here - but actual execution is incredibly simple. The day ahead prep is about 15m while the sanitation, steaming and inoculation can be easily completed in under 2h.
Learnings
Key takeaway: making sake at home is actually very easy if you have access to kojikome.
Then, in no particular order:
- this yeast was definitely not the right one, something more neutral would be better
- should try with a different rice
- can try bottle a couple of days early
- maybe procure a charcoal filter for next time?
That’s it! Awesome learning experience, really boosted our confidence in trying more rice-based brews, and got a nice result to drink.
 Weizen-ish